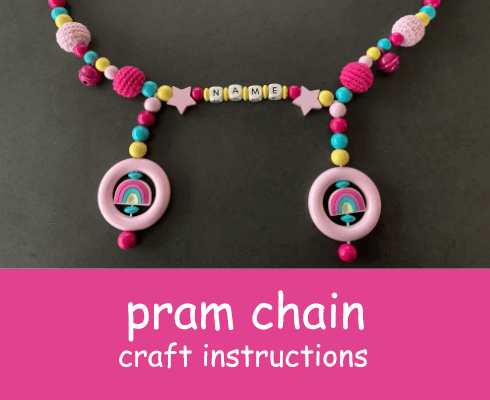
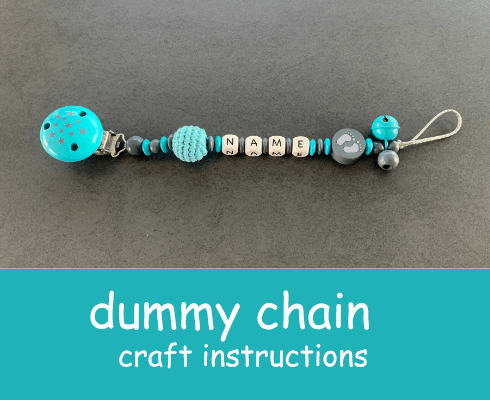
Craft instructions for a pram chain with name
Would you like to make a pram chain? Then our step-by-step instructions are just what you need. With our instructions and a little patience, it's easy to make your own pram chain. In any case, it will be something very special. Because the pram chain is something homemade that you can make wonderfully for your own baby or for friends and family. Who wouldn't be happy about such a great, homemade and personalised gift? With our illustrated instructions, crafting is sure to be a fun DIY experience for you.
Simply choose the right wooden or silicone beads and the accessories you need. And then you're ready to go!
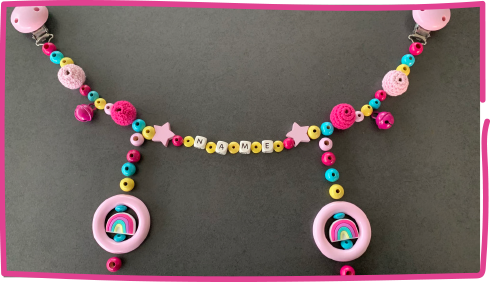
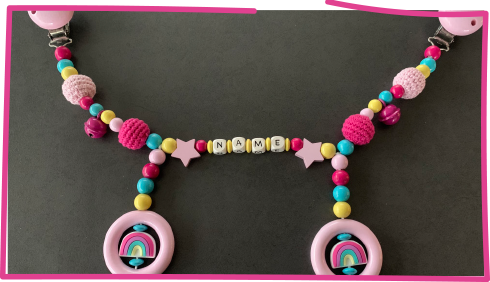
Craft accessories
- 2 wooden clips in plain colour or 2 motif clips
- PP polyester cord
- 6 safety beads
- Motif beads as you like, here e.g. crochet beads, stars and rainbow
- 2 wooden rings in size S with holes
- Wooden beads
- Wooden lenses
- Letter cubes for your desired name
- Additionally at will:
- 2 little bells
Step 1
It is best to sort and arrange the craft materials for your pram chain until it matches your ideas. You should first check where you would like to attach the chain to the pram in order to know the minimum length. There are no limits to your creativity, except for the maximum length of 38 cm. We always use safety beads when we make pram chains, dummy chains, mobiles, grasping rings or name pendants. Since you can sink the knot into it, we find it visually more advantageous than leaving it visible. In addition, the knot is protected from small, nimble children's hands.
Step 2
Now take a piece of PP polyester string and pull it through the metal eyelet on the dummy clip. To make stringing through the beads easier, melt the ends of the cord briefly with the lighter. Now string both ends through the stringing hole of the safety bead (large opening away from the clip). Now tie a tight double knot in one of the ends. Use a lighter to carefully weld the double knot and sink it into the safety bead. When making your own pram chain, it is important to do a tear test after each knot.

Step 3
Now string the beads and everything that will be part of the pram chain – except for the two strands that will later hang down. When you reach the end (or the place where the second clip will be attached), push the string through a safety bead with the large opening towards the chain. Now pull the cord through the clip's metal eyelet and back through the safety bead. Pull the cord as tight as possible to get the double knot as close as possible to the hole's opening. When the knot is in place, fuse it and sink it into the safety bead. It is important that you knot as tightly as possible so that the beads of the pram chain cover as much of the cord as possible.


Step 4
Now take another piece of PP cord and melt the ends with the lighter so that they can be strung through the holes more easily. Put the cord as a loop between two beads, at the place where a strand should hang. Lay both ends of the cord down and string them through a safety bead with the larger hole away from the chain. Then tie a double knot at the larger hole and melt it with the lighter so that it holds. Now sink the knot neatly into the hole.

Step 5
Now you can string the hanging strand bead by bead as you have arranged them beforehand. At the end, string another safety bead with the opening facing down. Now pull the string as tight as possible to get a double knot as close as possible to the opening.
When the knot is tight and in place, you should also fuse it and sink it completely. It is important that you knot as tightly as possible so that the beads cover as much of the string as possible.

Step 6
Repeat the same procedure for the second hanging strand. Now please make sure you do a tear test. This way, you can check that the knots are all holding and that the pram chain will not come undone.
You've already made your pram chain. We hope your baby will have lots of fun with it!
4 Advantages of Self-Made Pram Chains Made From Wooden Beads
Homemade pram chains can do more than just look pretty. Find out why you should do it yourself:
- Creative freedom of design: By designing the chain for your pram or buggy yourself, you decide on the shapes, motifs and colours of the wooden beads as well as extras such as bells or wooden rings. Personalise the pram chain with your child's first name or date of birth using letter cubes.
- Distraction for the baby: The pram chain dangles from the hood of your pram. This attracts your baby's curiosity. The vivid colours, swinging bead strands and jingling bells will almost magically attract your little one's eyes – adding variety to your pram or buggy rides.
- Personalised birth gift: Instead of buying mass-produced goods, you create a personalised pram chain yourself, bead by bead. With care, creativity and love for the child, you can make a cute baby accessory by hand. Many parents really appreciate this kind of effort. That's why a DIY pram chain is a wonderful gift for a birth. You can give it as a set together with a matching dummy chain with a name.
- A memento of childhood: As an accessory for the pram, your hand-made pram chain will become part of your everyday life with your child. When you see the colourful bead chain, you are sure to look back on some lovely walks with your little one. The pram chain therefore gains emotional value – and is therefore a loving memento of childhood.